Build & maintain multiple listings on any of 30+ guides on the localista network. Listings are reviewed and approved/disapproved within 24 hours by the localista team or a delegated content partner.
In this tutorial you will learn:
- How to create new listings
- How to manage your listings
- How to exclude individual listings
How to create listings?
Creating listings is simple and takes less than 5 minutes. Follow the steps below to get started.
- Login to the localista admin dashboard to get started, or see our public user account guide to register a new account.
- Click on the ADD NEW LISTING button to start creating your listing.
- Follow the steps on the page and refer to the tips on the side to ensure you follow our guidelines.
- When you’re done, simply SAVE your listing and either click Activate Listing if you’re ready to publish it for approval, or choose Keep Listing Inactive if it’s not ready yet.
How to manage listings?
All your listings can be managed in one place, follow the steps below to get started.
- Head to the MY LISTINGS tab to view all your listings. Here you can view all the details of your listings, preview them and manage any of your listings.
- Hover over the Triple Dots icon under the Actions heading to manage your listing.
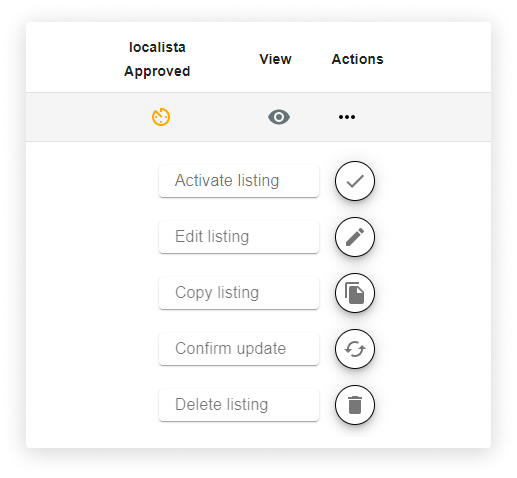
Example of the localista admin dashboard, on how to manage listings
Listing Exclusions
Admin users can be assigned a License ID to their accounts which allows them to exclude individual listings right from the localista admin dashboard.
Excluding listings is simple, follow the steps below to get started.
- Contact localista support at info@localista.com.au to get the exclusions tab set up on your account. Skip to the next step if you already have the tab.
- Head to the MY WEBSITE tab, where you can view all listings attached to the License ID that has been assigned to your account.
- Exclude listings by checking the box under the Excluded column.